How To Change Laptop Keyboard – Best 5 Tips
Step-by-Step Guide: Changing Your Laptop Keyboard Made Easy

How To Change Laptop Keyboard? Many laptop users may find themselves in a situation where they need to Change Laptop Keyboard due to malfunction or damage. While it may seem like a daunting task, changing a laptop keyboard is actually a relatively simple process that can be done with just a few basic tools and some patience.
Before diving into the replacement process, it’s important to understand the different types of laptop keyboards and how to identify a malfunctioning keyboard. Some common signs of keyboard malfunction include unresponsive keys, sticky or loose keys, and keys that produce the wrong characters when pressed. Once the issue has been identified, the next step is to purchase the right replacement keyboard for the laptop model.
With the right replacement keyboard in hand, the next step is to prepare for the replacement process by gathering the necessary tools and taking precautions to prevent damage to the laptop. From there, the old keyboard can be removed and the new one installed. While there may be some troubleshooting involved, with the right approach, changing a laptop keyboard can be a straightforward process.
Key Takeaways
- Understanding the different types of laptop keyboards and how to identify a malfunctioning keyboard is crucial before attempting to replace it.
- Purchasing the right replacement keyboard for the laptop model is important to ensure compatibility and proper function.
- Proper preparation, including gathering necessary tools and taking precautions to prevent damage to the laptop, can make the replacement process smoother.
Understanding Your Laptop Keyboard

Laptops have become an integral part of our lives, and we use them for work, entertainment, and communication. The keyboard is one of the most important components of a laptop, as it is the primary way to input data. Understanding your laptop keyboard is essential for using it effectively.
Layout
Laptop keyboards come in different layouts, depending on the manufacturer and the region. The most common layout is the QWERTY layout, which is used in the United States, Canada, and other English-speaking countries. Other layouts include AZERTY, used in France and Belgium, and QWERTZ, used in Germany, Austria, and Switzerland.
Function Keys
Function keys are a set of keys located at the top of the keyboard, labeled F1 to F12. They perform various functions, depending on the operating system and the software being used. For example, F1 is used to open the Help menu in Windows, while F5 is used to refresh a web page.
Special Keys
In addition to the standard keys, laptop keyboards have special keys that perform specific functions. These keys may include the Windows key, which opens the Start menu in Windows, and the Alt key, which is used in combination with other keys to perform shortcuts. Some laptops also have multimedia keys for controlling audio and video playback.
Touchpad
Most laptops have a touchpad located below the keyboard, which is used as a pointing device. The touchpad allows you to move the cursor on the screen and perform other functions, such as scrolling and zooming. Some laptops also have a pointing stick, which is a small joystick located between the G, H, and B keys.
Understanding your laptop keyboard is essential for using it effectively. By familiarizing yourself with the layout, function keys, special keys, and touchpad, you can work more efficiently and get the most out of your laptop.
Identifying Keyboard Malfunction
When a laptop keyboard starts to malfunction, it can be frustrating to try to figure out what the problem is. However, identifying the issue is the first step towards fixing it. Here are some common signs of keyboard malfunction to look out for:
Certain keys not working
If certain keys on the keyboard are not working, it could be a sign of a malfunction. This could be due to a physical issue, such as debris or dust getting stuck under the keys, or a software issue, such as a driver problem.
Random keys typing on their own
If the laptop keyboard is typing random keys on its own, it could be due to a stuck key or a software issue. This can be frustrating, as it can make it difficult to type anything without the random keys interrupting.
Sticky or unresponsive keys
If the keys feel sticky or unresponsive, it could be due to a physical issue, such as spilled liquid or debris under the keys. This can make it difficult to type, as the keys may not register when pressed.
Backlight not working
If the keyboard backlight is not working, it could be due to a software issue, such as a driver problem, or a physical issue, such as a loose connection. This can make it difficult to type in low-light situations.
By identifying the specific issue with the laptop keyboard, it becomes easier to troubleshoot and fix the problem.
Purchasing the Right Replacement Keyboard
To replace your laptop keyboard, start by purchasing a compatible replacement. Check the manufacturer’s website for support and part information, or search by your laptop model number to find the right keyboard. You can also explore online marketplaces like Amazon or eBay. Be sure to enter your model number with the keyword “keyboard” to narrow the results, and always read the product descriptions carefully to confirm compatibility.
When purchasing a replacement keyboard, it’s also important to consider the quality of the keyboard. Cheaper keyboards may not be as durable as more expensive ones, and may not last as long. It’s important to find a balance between price and quality when selecting a replacement keyboard.
In summary, when purchasing a replacement keyboard for a laptop, it’s important to choose a keyboard that is compatible with the laptop model and has the same layout as the old keyboard. Consult the laptop manufacturer’s website or search for replacement keyboards on online marketplaces. Consider the quality of the keyboard when making a purchase.

Preparation for Keyboard Replacement
Before beginning the process of replacing a laptop keyboard, it is important to gather the necessary tools and create a safe workspace. This will ensure that the replacement is done efficiently and without any damage to the laptop or the new keyboard.
Gathering Necessary Tools
The first step in preparing for a keyboard replacement is to gather all the necessary tools. The tools required for replacing a laptop keyboard may vary depending on the laptop model, but the following tools are generally required:
- Screwdrivers (usually Phillips head and/or Torx)
- Prying tool (such as a plastic spudger or guitar pick)
- Replacement keyboard
- Anti-static wrist strap (optional but recommended)
It is important to ensure that the screwdrivers are the correct size for the screws on the laptop. Using the wrong size screwdriver can damage the screws or the laptop. The prying tool is used to gently pry open the laptop casing and remove the keyboard. The replacement keyboard should be compatible with the laptop model.
Creating a Safe Workspace
The second step in preparing for a keyboard replacement is to create a safe workspace. This involves finding a clean, flat surface to work on and ensuring that the workspace is well-lit. It is also important to remove any static electricity from the workspace, as static electricity can damage the laptop components.
To remove static electricity, it is recommended to use an anti-static wrist strap. This strap is worn on the wrist and is connected to a grounded object, such as a metal object or a grounded electrical outlet. This will discharge any static electricity from the body and prevent damage to the laptop.
In addition to these steps, it is also recommended to have a clean workspace. This involves removing any clutter or debris from the workspace, as this can cause damage to the laptop or the replacement keyboard. By following these steps, the laptop keyboard replacement can be done safely and efficiently.

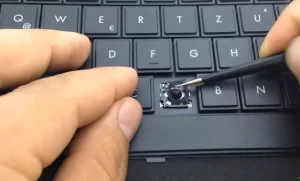
Credit: Youtube
Removing the Old Keyboard
Before replacing a laptop keyboard, the old keyboard must be removed. This section will cover the steps needed to remove the old keyboard from a laptop.
Powering Off the Laptop
The first step to removing a laptop keyboard is to power off the laptop. Ensure that the laptop is completely powered off by unplugging the power cord and removing the battery. This will prevent any electrical damage to the laptop or the new keyboard during the replacement process.
Unlocking the Keyboard
Once the laptop is powered off, the next step is to unlock the keyboard. Depending on the laptop model, the keyboard may be held in place by screws or clips. Refer to the laptop’s service/repair manual to determine the proper method for unlocking the keyboard.
Disconnecting the Keyboard
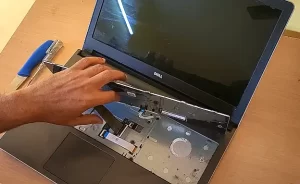
After the keyboard is unlocked, the next step is to disconnect it from the laptop. Carefully remove the frame around the keyboard using a flat tool, such as a screwdriver. Then, unscrew the keyboard and gently lift it up. Detach the ribbon connecting the keyboard to the laptop. Be sure to handle the keyboard and ribbon cable with care to avoid damage.
Once the old keyboard is removed, it can be replaced with a new one. Refer to the laptop’s service/repair manual for instructions on how to install the new keyboard.
Installing the New Keyboard
Once the old keyboard has been removed, it’s time to install the new one. This section will provide a step-by-step guide to connecting, securing, and testing the new keyboard.
Connecting the New Keyboard
Before connecting the new keyboard, make sure it’s the correct model for the laptop. Check the manufacturer’s website or service manual to ensure compatibility.
To connect the new keyboard, follow these steps:
- Align the keyboard with the laptop’s frame and ensure the cable is in the correct position.
- Gently press the cable into the connector until it clicks into place.
- Double-check that the cable is secure and properly seated.
Securing the Keyboard
Once the keyboard is connected, it’s time to secure it in place. Follow these steps:
- Align the keyboard with the laptop’s frame and ensure it’s properly positioned.
- Secure the keyboard with the screws or clips that were removed earlier.
- Replace any trim pieces or covers that were removed.
Testing the New Keyboard
Before reassembling the laptop, it’s important to test the new keyboard to ensure it’s working properly. Follow these steps:
- Power on the laptop and wait for it to boot up.
- Test each key on the keyboard to ensure they’re functioning properly.
- Test any special function keys or hotkeys to ensure they’re working as intended.
- If any keys aren’t working, double-check the cable connection and try again.
Once the new keyboard has been tested and confirmed to be working properly, it’s time to reassemble the laptop. Follow the steps in the previous section to reattach any trim pieces or covers, then replace the battery and power cord.

Credit: Youtube
How To Change Laptop Keyboard Troubleshooting Common Issues
When changing a laptop keyboard, it is possible to encounter some common issues that may require troubleshooting. This section will cover some of the most common issues and how to fix them.
Unresponsive Keys
One of the most common issues that can arise after changing a laptop keyboard is unresponsive keys. If a key is not responding or is not registering when pressed, there are a few things that can be done to fix the issue.
First, check to see if the key is physically stuck or if there is debris under the key. If this is the case, gently clean the key with a soft cloth or compressed air. If the key is still not responding, try using an external keyboard to see if the issue is with the laptop or the keyboard itself.
If the external keyboard works, then the issue is likely with the laptop keyboard and a replacement may be needed. However, if the external keyboard also has unresponsive keys, the issue may be with the laptop’s software or drivers. In this case, updating the drivers or reinstalling the keyboard software may fix the issue.
Incorrect Key Outputs
Another common issue that can arise after changing a laptop keyboard is incorrect key outputs. This can occur when a key is pressed, but a different character or symbol is displayed on the screen.
If this is the case, first check to make sure the keyboard language settings are correct. If the language settings are correct, then the issue may be with the keyboard’s firmware or software. Updating the keyboard firmware or reinstalling the software may fix the issue.
In some cases, incorrect key outputs may be caused by a physical issue with the keyboard, such as a damaged or faulty circuit board. If this is the case, a replacement keyboard may be needed.
Overall, troubleshooting common issues with a laptop keyboard after changing it can be a simple process. By following these steps, users can quickly identify and fix any issues that may arise.

I am a technology Specialized writer and blogger based in the USA & UK. I have four years of experience in Cyber Security, Technology, Social Media and all types of electronic devices like computer laptops etc. So I work on solving these issues and give various tips on these issues


